Overview
DocX is a desktop application designed for receptionists in clinics. It features patient management, doctor management, medical history management and appointment management. The user interacts with it using a CLI, and it has a GUI created with JavaFX. It is written in Java, and has about 10 kLoC.
Summary of contributions
-
Major enhancement: added appointment management features
-
What it does: allows the user to manage appointments between patients and doctors.
-
Justification: This is a core feature to allow appointments to be managed in an organized manner.
-
Highlights: Appointments can be prone to many issues as it deals with date and time. Therefore, extreme care must be taken when handling user input to prevent any issues with invalid date and time combinations. Also there are numerous constraints, such as new appointments can only be created during business hours, be in the future and patients can only complete their appointments after they are over.
-
-
Minor enhancement:
-
UI: Enhanced the user interface to include 4 sections, a section to display patients, a section to display doctors, a section to display medical history, a section to display appointments. Also added the ability to switch an entire panel to display the current relevant content.
-
Model: Utilized the singleton design pattern is synchronize the generation of unique patient and doctor IDs across the entire application to ensure there are no duplicate IDs.
-
-
Code contributed: https://nus-cs2103-ay1819s2.github.io/cs2103-dashboard/#=undefined&search=amuletxheart
-
Other contributions:
-
Project management:
-
Managed releases
v1.1-v1.4(4 releases) on Github -
Managed disputes regarding features and missed internal deadlines between teammates.
-
-
Documentation:
-
Community:
-
PRs reviewed and gave suggestions to improve workflow and boost productivity (examples: 1, 2)
-
Assigned user stories and tasks to team members (list)
-
Reported bugs and suggestions for other teams in the class (list)
-
Parts of the appointment management features I added were utilized by several teammates (examples: 1, 2)
-
-
Contributions to the User Guide
Given below are sections I contributed to the User Guide. They showcase my ability to write documentation targeting end-users. |
Introduction
DocX is a desktop clinic management application designed for receptionists in small clinics. Even today, many receptionists in small clinics are still using pen and paper to track patients' information, which can be prone to human errors and reduced productivity if the number of patients is large. Our clinic management application is designed specifically to make this process much easier for them.
The features we provide include:
-
Record and manage patients coming to the clinic
-
Record and manage doctors in the clinic
-
Record and manage medical histories of patients
-
Make and manage appointments for patients
-
Record and manage medicines in the clinic and prescriptions given by doctors
While it has a GUI, most of the user interactions happen using a CLI (Command Line Interface). More importantly, DocX is optimized for those who prefer to work with a Command Line Interface (CLI) while still having the benefits of a Graphical User Interface (GUI). No technical knowledge on programming or terminal commands is needed. If you can type normal words fast, DocX can get your clinic management tasks done faster than traditional GUI apps.
Interested? Jump to the [Quick Start] to get started. Enjoy!
Adding an appointment: add-appt
Adds an appointment between a patient and a doctor
Format: add-appt pid/PATIENT_ID did/DOCTOR_ID d/DATE_OF_APPT t/START_TIME
Examples:
-
add-appt pid/1 did/7 d/2019-06-01 t/09:00
Adds an appointment with patient ID '1' and doctor ID '7' on 1st June 2019 at 9am. -
add-appt pid/3 did/9 d/2019-06-01 t/13:00
Adds an appointment with patient ID '3' and doctor ID '9' on 1st June 2019 at 1pm.
Listing appointments : list-appt
Shows a list of appointments in the system. Can be used with or without optional keywords to filter the result.
Format: list-appt [pid/PATIENT_ID] [did/DOCTOR_ID] [d/DATE_OF_APPT] [t/START_TIME] [s/STATUS] [c/CHRONOLOGY]
Examples:
-
list-appt
Lists all appointments. -
list-appt c/FUTURE
Lists all appointments that are in the future. -
list-appt pid/1
Lists all appointments with patient ID 1. -
list-appt pid/1 did/7
Lists all appointments with patient ID 1 and doctor ID 7. -
list-appt d/2018-06-01 t/09:00
Lists all appointments with date 2018-06-01 and time 09:00. -
list-appt s/ACTIVE
Lists all appointments that are marked as ACTIVE.
Changing an appointment status : mark-appt
Mark an appointment as ACTIVE, CANCELLED, MISSED or COMPLETED
Format: mark-appt INDEX s/NEW_STATUS
Examples:
-
mark-appt 1 s/CANCELLED
The appointment with INDEX 1 is cancelled. -
mark-appt 3 s/MISSED
The appointment with INDEX 3 was missed. Note that this can only be done to elapsed appointments.
APPOINTMENT COMMANDS
-
Add a new appointment
add-appt pid/PATIENT_ID did/DOCTOR_ID d/DATE_OF_APPT t/START_TIME
e.g.add-appt pid/1 did/1 d/2019-06-01 t/09:00 -
Listing appointments
list-appt [pid/PATIENT_ID] [did/DOCTOR_ID] [d/DATE_OF_APPT]
[t/START_TIME] [s/STATUS] [c/CHRONOLOGY]
e.g.list-appt -
Changing an appointment status :
mark-appt INDEX s/NEW_STATUSe.g.mark-appt 1 s/CANCELLED
Contributions to the Developer Guide
Given below are sections I contributed to the Developer Guide. They showcase my ability to write technical documentation and the technical depth of my contributions to the project. |
How the architecture components interact with each other
The Sequence Diagram below shows how the components interact with each other for the scenario where the user
issues the command add-appt pid/1 did/7 d/2019-06-01 t/09:00.

add-appt pid/1 did/7 d/2019-06-01 t/09:00 commandThe sections below give more details of each component.
Logic component
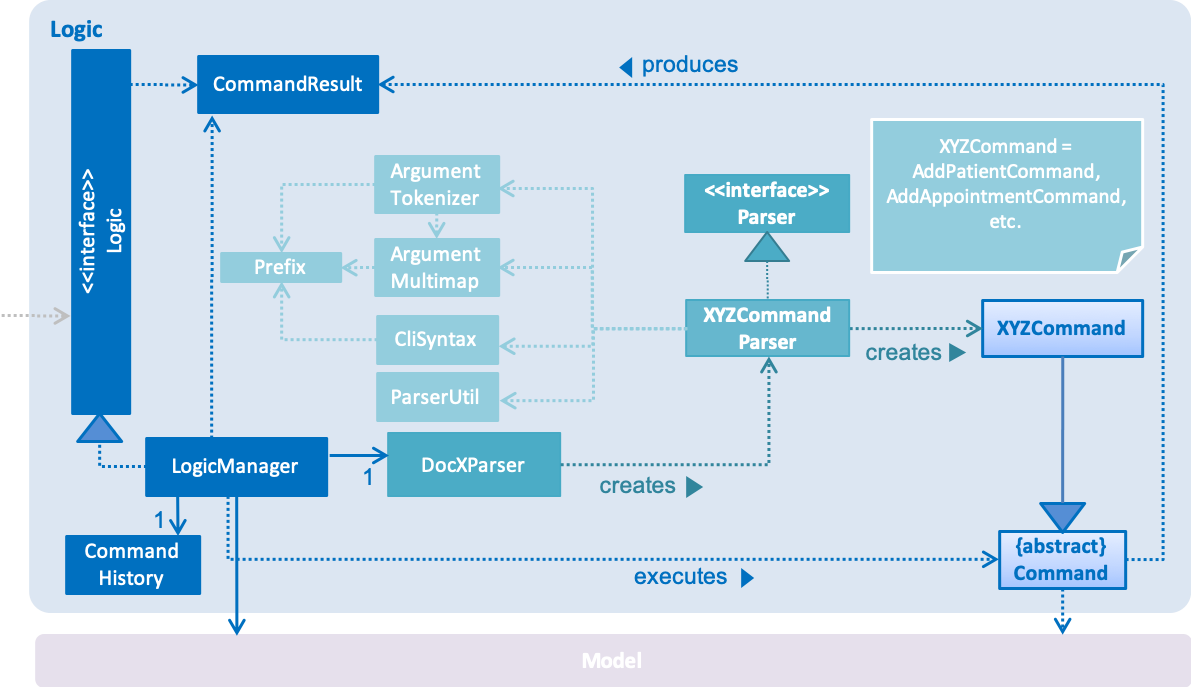
API :
Logic.java
-
Logicuses theDocXParserclass to parse the user command. -
This results in a
Commandobject which is executed by theLogicManager. -
The command execution can affect the
Model(e.g. adding a new appointment). -
The result of the command execution is encapsulated as a
CommandResultobject which is passed back to theUi. -
In addition, the
CommandResultobject can also instruct theUito perform certain actions, such as displaying help to the user or showing a different panel (appointment panel).
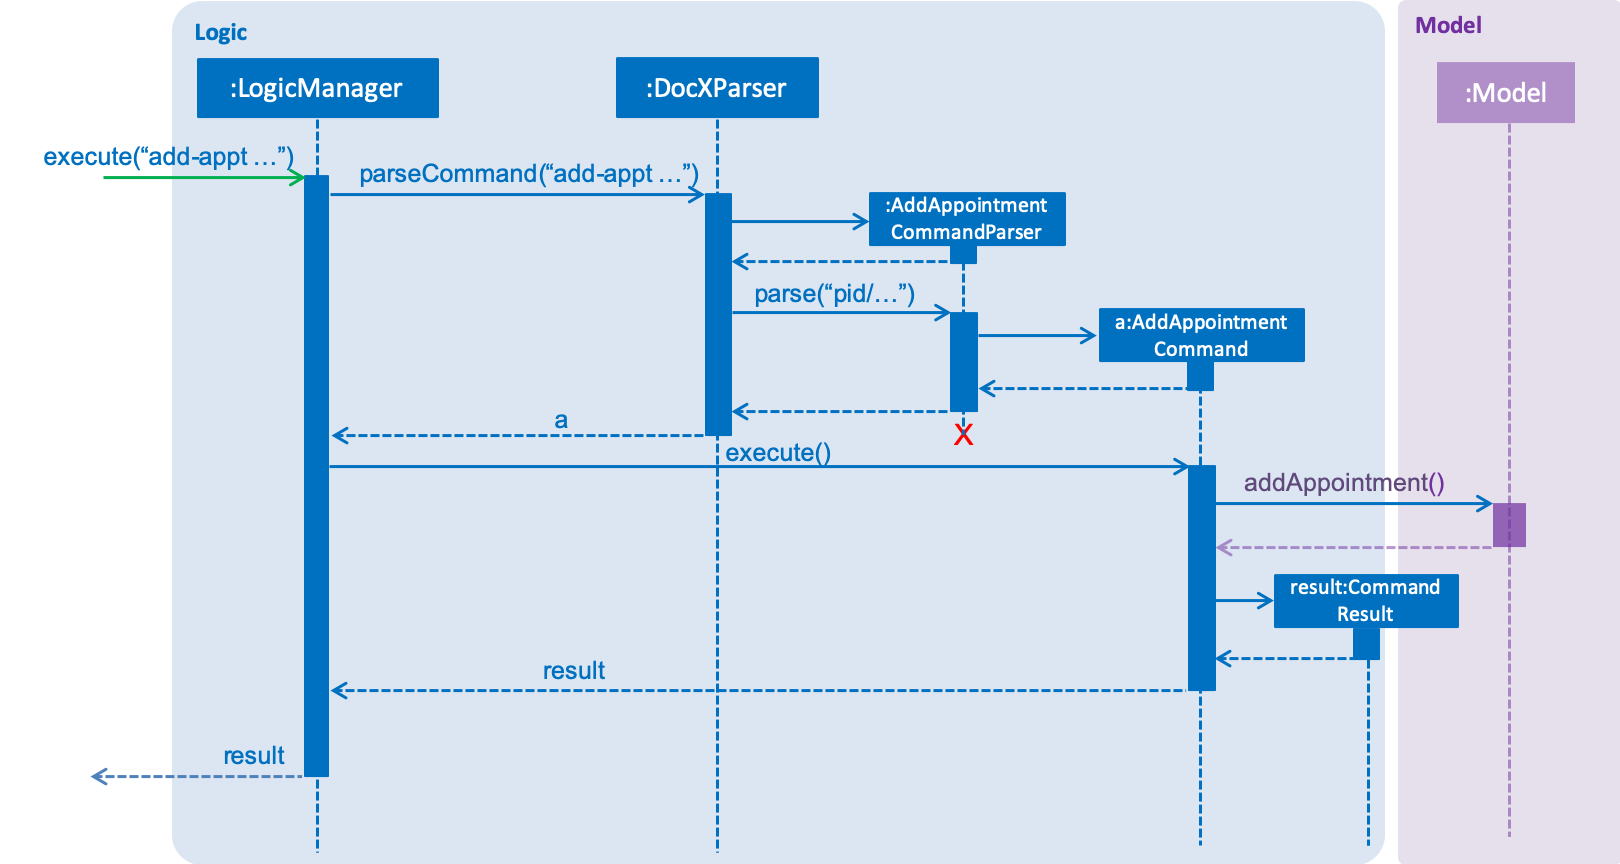
Given below is the Sequence Diagram for interactions within the Logic component for the
execute("add-appt pid/1 did/7 d/2019-06-01 t/09:00") API call. Interactions with other components such as
UI or Model is omitted or simplified for clarity.
add-appt … CommandAdd Appointment Feature
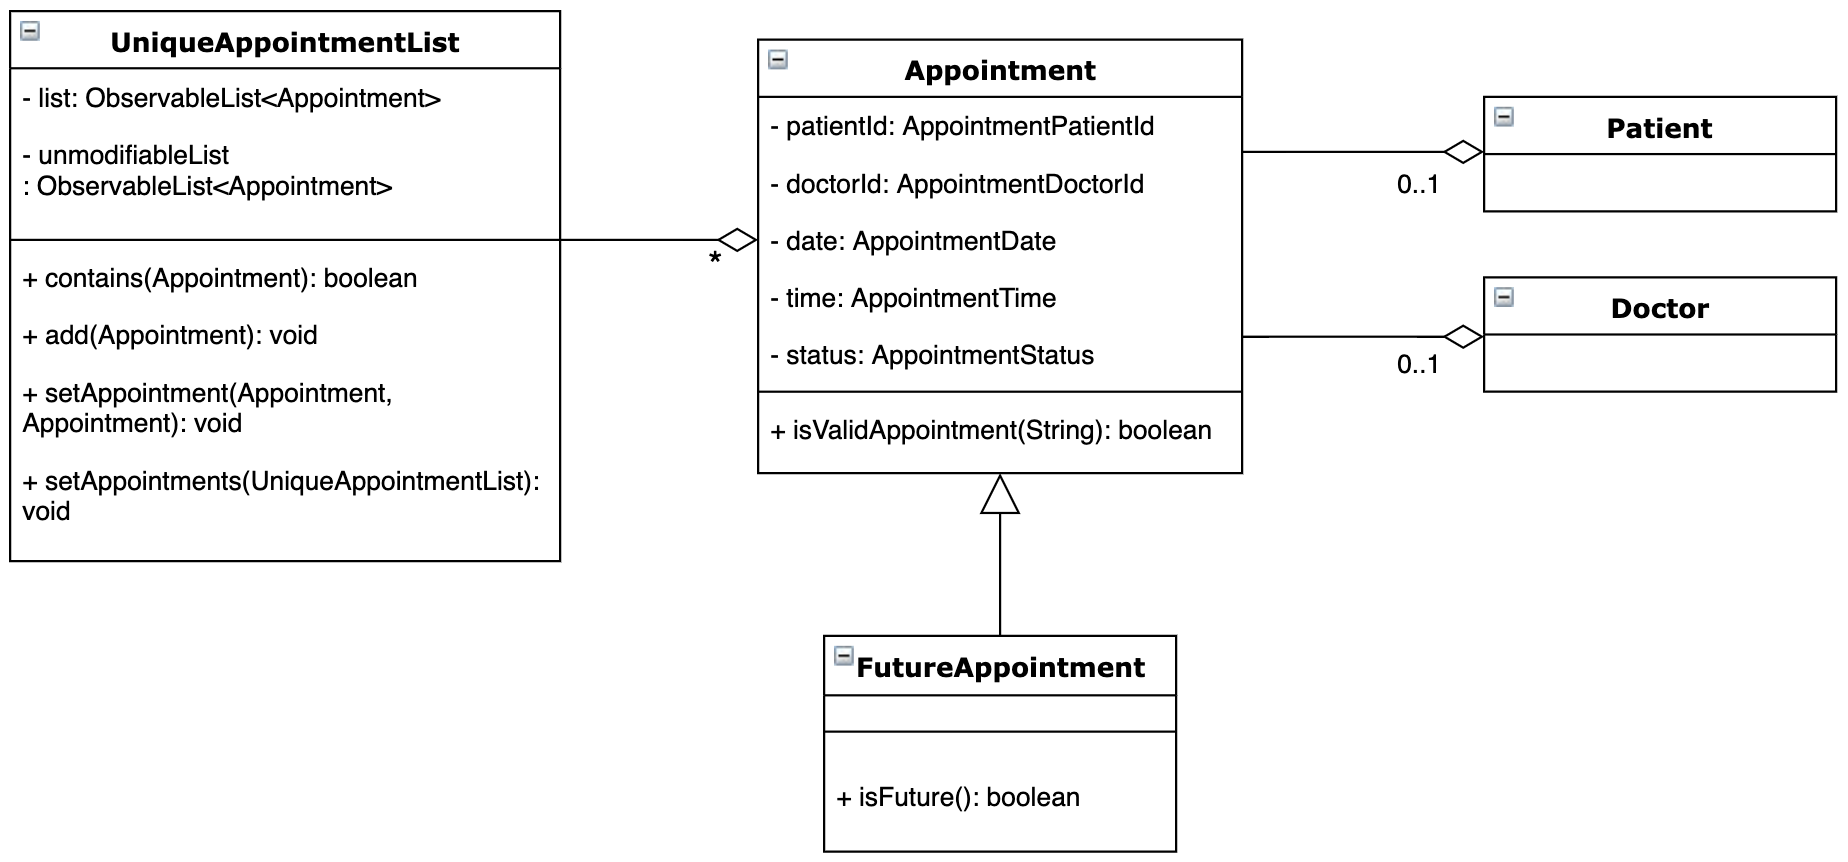
Appointments are created to facilitate future appointments between patients and doctors. A patient can have none or multiple appointments, a doctor can have none or multiple appointments. An appointment cannot overlap with a patient’s or doctor’s existing appointments. This is determined if the date and time overlaps. An appointment must specify a patient ID, doctor ID, date and time.
The following class diagram shows the modelling of appointments in our application. Details in Patient and Doctor are omitted for clarity.
Current Implementation
The add appointment feature is enabled by the classes: Appointment, FutureAppointment,
AddAppointmentCommandParser, AddAppointmentCommand and JsonAdaptedAppointment.
-
Appointment- This is an entity class to store information regarding an appointment, such as patient ID, Doctor ID, date, time and status. -
FutureAppointment- This is an entity class that extendsAppointment. This class ensures that a newly created appointment is always in the future compared to the system time. The comparison between date and time is done usingjava.time.LocalDateTime. It is not recommended to perform such checks manually, as there are many edge case in a calendar. -
AddAppointmentCommandParser- This is a class that parses a user input string to anAppointmentCommandobject. Validation for user input data that do not require access to the model is performed here. -
AddAppointmentCommand- This is where the actual logic of the add appointment command is mainly performed. It will access the model to ensure there is no duplicate appointment before adding the appointment to the model. -
JsonAdaptedAppointment- This class functions as an adapter betweenAppointmentand the Storage layer. It specifies how to convert from Java appointment object to JSON file format and vice versa. This is also where validation for correct data format is performed when the save file is loaded back into memory.
The following sequence diagram shows how add appointment works on a high level:
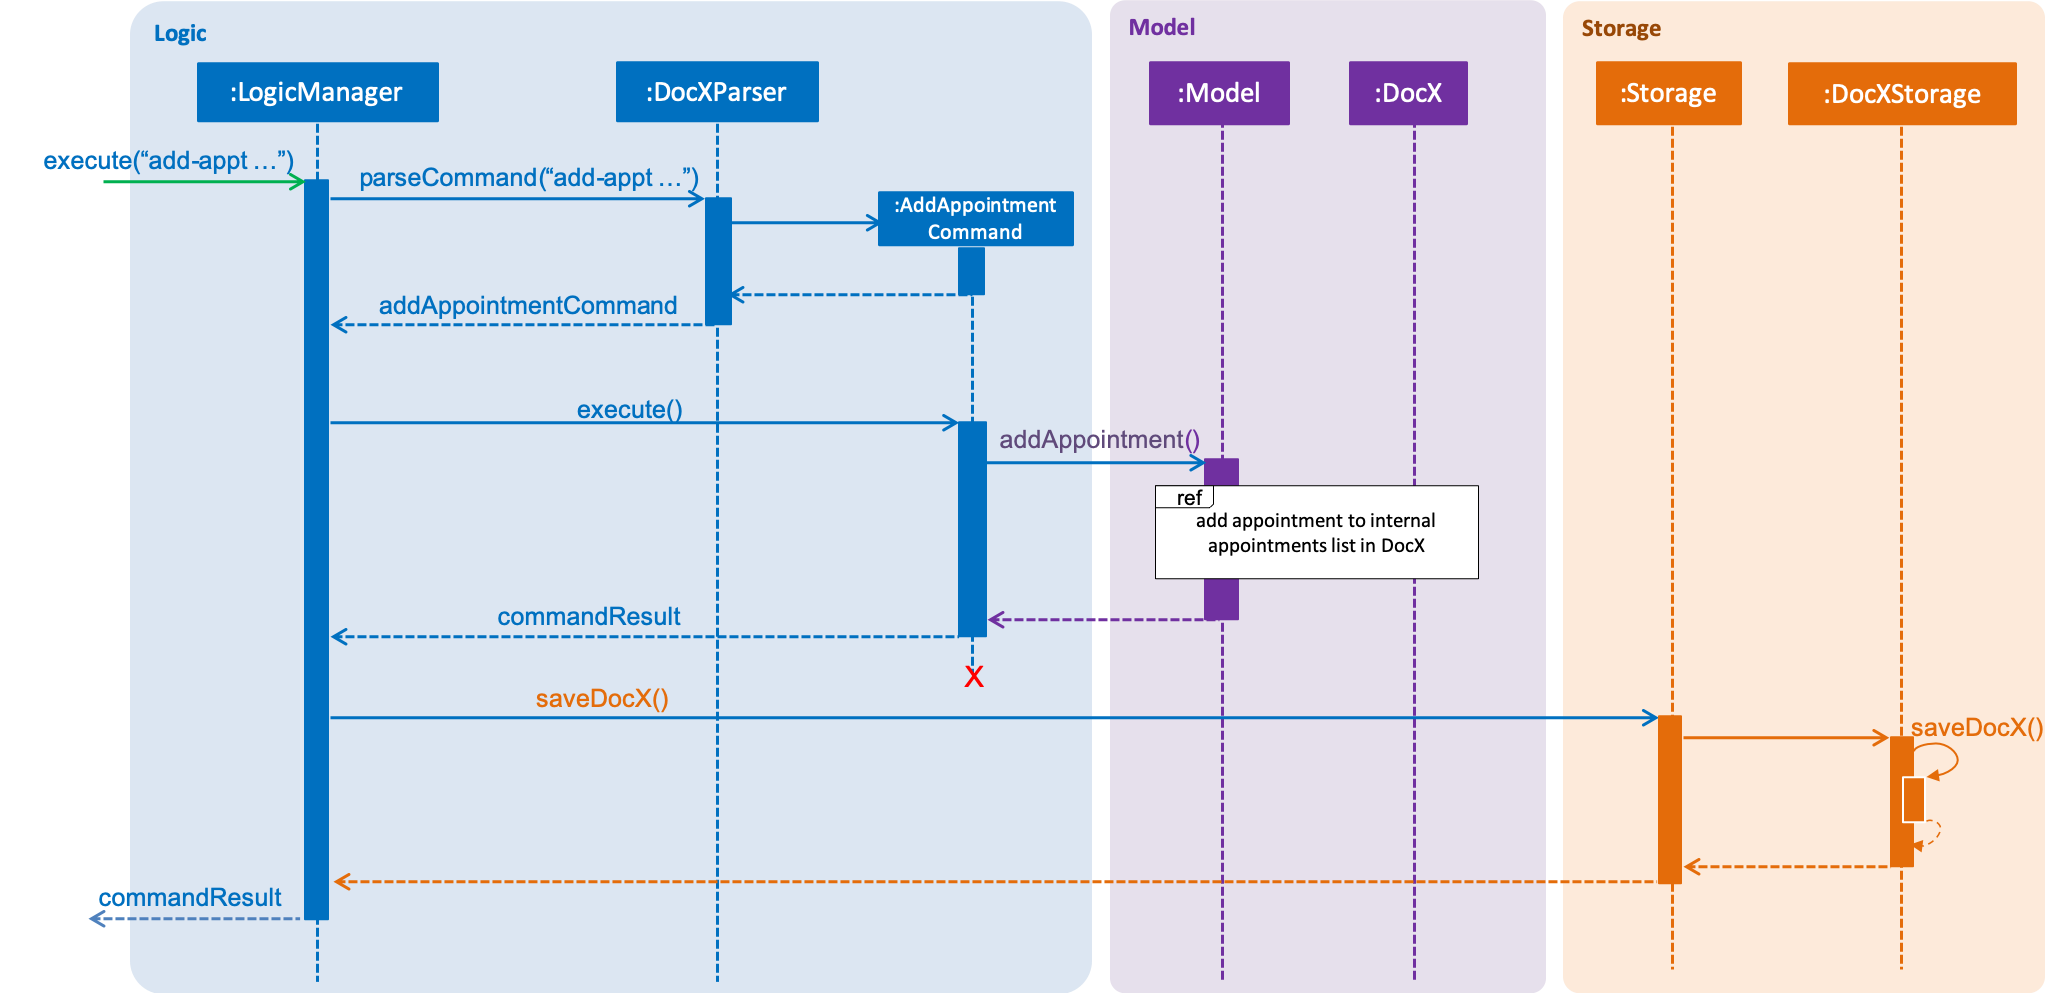
Steps:
-
When a user enters an add appointment command, the input is first validated by
AddAppointmentCommandParser. Here, inputs that do not require access to the model is validated, such as ensuring patient ID, doctor ID, date and time are of the correct format, as well as ensuring the appointment is in the future. A newAddAppointmentCommandobject is created. -
The Logic layer then executes the
AddAppointmentCommand. Here, the appointment is checked against existing appointments in the model to ensure there are no duplicates. The appointment object is then sent to the Model layer. -
The model adds the appointment to its internal list. The internal list is a
javafx.collections.ObservableListand the UI layer through aListChangeListeneris notified and updated following the observer pattern. -
The Logic layer will be notified that the model has been modified through an
InvalidationListenerand then it stores the new appointment to disk using the Storage layer. The Storage layer will convert the appointment Java object into the JSON file format using the format specified inJsonAdaptedAppointment. The next time the application is opened, the Storage layer will useJsonAdaptedAppointmentagain to convert appointments in the JSON file back into appointment objects.
Appointment
-
Adding a new appointment
-
Prerequisites: There are existing patients and doctors in the system.
-
Test case:
add-appt pid/1 did/7 d/2019-06-01 t/09:00
Expected: A new appointment with the given patient, doctor, date and time is added. -
Test case:
add-appt
Expected: No appointment is added. All fields must be filled and not left empty. The correct command format is shown. -
Other incorrect add-appt commands to try:
add-appt pid/1 did/7,add-appt d/2019-06-01 t/09:00.
Expected: Similar to previous. -
Test case:
add-appt add-appt pid/1 did/7 d/2019-02-29 t/30:00
Expected: No appointment is added. The date and time should be in the valid format and be a valid date on the calendar.
-
-
Marking an appointment as "CANCELLED" (or back to ACTIVE)
-
Prerequisites: List all appointments using the
list-apptcommand. All appointments are in the list. -
Test case:
mark-appt 1 s/CANCELLED
Expected: First appointment in the list is marked as "CANCELLED". -
Test case:
mark-appt 1 s/ASDF
Expected: No appointment is changed. A list of valid appointment status that can be input is shown. -
Other incorrect mark-appt commands to try:
mark-appt,mark-appt 1 s/123.
Expected: Similar to previous.
-
-
Listing appointments
-
Prerequisites: There are existing appointments in the system.
-
Test case:
list-appt
Expected: All appointments in the system are shown. -
Test case:
list-appt pid/1
Expected: Appointments made by patient ID 1 are shown. -
Test case:
list-appt did/7
Expected: Appointments made by doctor ID 7 are shown. -
Test case:
list-appt c/PAST
Expected: Only appointments in the past are shown. -
Test case:
list-appt d/2019-06-99
Expected: No appointments are shown. A message prompting the user to enter the correct command format is shown. -
Other incorrect list-appt commands to try:
list-appt t/99:00,list-appt s/ASDF,list-appt c/TOMORROW.
Expected: Similar to previous.
-